There is nothing quite as annoying as the rhythmic drip, drip, drip of a leaky faucet keeping you awake at night. Beyond the annoyance, that sound represents money going down the drain. But leaks aren’t the only reason homeowners in Mableton and Cobb County look to update their plumbing hardware. Sometimes you just get tired of looking at the same outdated brass fixtures in your bathroom that have been there since the 1990s. Updating your plumbing fixtures is one of the most cost-effective ways to modernize your home. It can instantly lift the look of a kitchen or bath without the price tag of a complete remodel. While many residents in Metro Atlanta feel comfortable picking up a wrench, plumbing can be deceptive. What looks like a simple Saturday afternoon project can quickly turn into a frustrating ordeal if you aren’t prepared. Whether you are dealing with a malfunction or want a fresh aesthetic, this guide from Quick Action Plumbers will walk you through the basics of swapping out your hardware. We will cover why you should make the change, how to handle a bathroom faucet replacement, and the specifics of updating shower trims.
Why You Should Replace Your Faucet & Fixtures
Deciding to replace faucet hardware often comes down to two main factors: function and fashion. However, there are several benefits to making the switch that you might not have considered. Here are the top reasons to upgrade your fixtures:
- Water Efficiency: Older faucets often have lower flow rates or hidden leaks that waste gallons of water each year. Newer models, especially those labeled WaterSense, are designed to reduce water usage without sacrificing pressure. This is a great way to lower utility bills.
- Eliminating Leaks: A worn-out washer or cartridge inside a faucet can cause persistent dripping. While repairs are possible, sometimes the internal corrosion is significant enough that a full replacement is the smarter, longer-lasting option.
- Improved Hygiene: Touchless faucets are becoming increasingly popular in residential homes. They reduce the spread of germs and are incredibly convenient when your hands are covered in cooking ingredients or gardening soil.
- Increased Home Value: If you are planning to sell your home in Cobb County, details matter. Buyers notice outdated fixtures. A modern, stylish faucet suggests the home has been well-maintained and updated.
- Better Functionality: Modern kitchen faucets often feature pull-down sprayers and higher arcs, making it much easier to wash large pots and pans than with standard low-profile models.
A Step-by-Step Guide to Bathroom Faucet Replacement
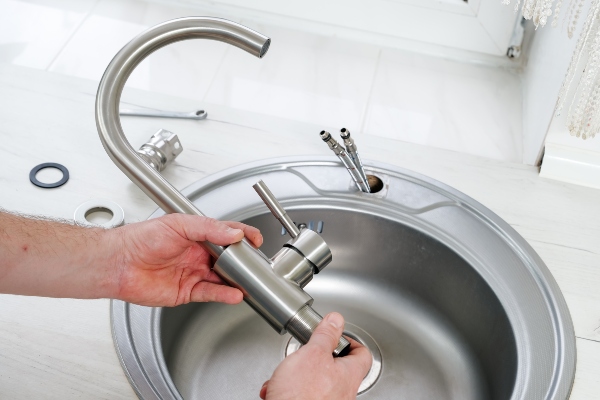
Replacing a faucet in a sink setup is one of the most common DIY plumbing tasks. Before you begin, ensure you have the right type of faucet. Check if your sink is a “centerset” (where the handles and spout share a base) or “widespread” (where the handles and spout are separate). Buying the wrong configuration is the most common mistake homeowners make. Once you have the correct hardware, follow these steps for a successful bathroom faucet installation project:
- Shut Off the Water: Look under the sink for the shut-off valves. Turn them clockwise until they are tight. If you don’t have isolation valves under the sink, you will need to shut off the main water supply to the house. Turn on the faucet to drain any remaining water and confirm the supply is off.
- Disconnect the Supply Lines: Place a bucket or towel under the pipes to catch residual water. Use an adjustable wrench to loosen the nuts connecting the supply lines to the faucet. If they are old and stuck, a little penetrating oil can help loosen them.
- Remove the Old Faucet: This is often the most challenging part due to tight spaces and corrosion. You will need to unscrew the mounting nuts that hold the faucet to the sink from underneath. A specialized tool called a basin wrench is invaluable here, as it reaches up into the tight space behind the sink bowl. Once the nuts are off, lift the old faucet away.
- Clean and Prep: You will likely find a ring of grime or old plumber’s putty where the old faucet sat. Scrape this away carefully, then clean the surface with a specialized cleaner or rubbing alcohol. A clean surface ensures a watertight seal for the new unit.
- Install the New Faucet: Place the plastic gasket (usually included) over the faucet holes. If your model doesn’t come with a gasket, apply a rope of plumber’s putty. Feed the new faucet lines through the holes. From underneath, screw on the mounting nuts by hand until they are snug, then tighten them with your wrench or basin wrench. Be careful not to overtighten, as this can crack the porcelain sink.
- Connect and Test: Reconnect the supply lines to the valves (hot to hot, cold to cold). Use plumber’s tape on the threads to prevent leaks. Turn the water back on slowly and check for drips. Remove the aerator from the spout and let the water run for a minute to clear out any debris, then replace the aerator.
How to Change Shower Fixtures
Updating your shower is slightly different from updating a sink. When people ask “how to change shower fixtures,” they usually mean changing the trim (the handle and the showerhead) rather than the valve inside the wall. Changing the valve requires tearing out tile and soldering pipes—a job strictly for professionals. However, if you buy a trim kit that matches your existing valve brand (e.g., swapping a Delta for a Delta), you can easily update the look without demolition. Here is how to handle the swap:
- Prep the Area: Cover the drain with a cloth or tape. You do not want small screws falling down the drain, which turns a cosmetic update into a major headache. Just like the sink, ensure your water supply is turned off before you start unscrewing anything.
- Remove the Handle: Look for a set screw on the underside of the handle. You will typically need an Allen wrench (hex key) or a small Phillips screwdriver to remove it. Once the screw is out, pull the handle straight off. If it is stuck due to mineral buildup, you may need a handle puller tool or some vinegar to dissolve the deposits.
- Remove the Escutcheon Plate: This is the round metal plate against the wall. It is usually held on by two screws. Remove them and pull the plate off. You may need to cut through old caulk around the edge with a utility knife to break the seal.
- Install the New Trim: Slide the new escutcheon plate over the valve stem and screw it into place. Make sure to caulk the top and sides of the plate where it meets the wall to prevent water from getting behind the tile, but leave the bottom un-caulked so any water that does get in can drain out.
- Attach the New Handle: Slide the new handle onto the stem and tighten the set screw. Test the handle to ensure it turns smoothly and engages the water correctly.
- Swap the Showerhead: This is the easiest part. Use a wrench to unscrew the old showerhead from the shower arm protruding from the wall. Wrap the arm threads with new plumber’s tape, then screw on the new showerhead. Hand-tighten it first, then give it a quarter-turn with a wrench.
When to Call a Professional
While DIY projects can be rewarding, plumbing requires patience and precision. Old pipes in Mableton and Metro Atlanta homes can be brittle, and a simple twist can cause a pipe to snap or a valve to strip. If you encounter rusted nuts that won’t budge, lack isolation valves under your sink, or if you want to change a shower valve behind the wall, it is best to call in the experts. At Quick Action Plumbers, we have been serving Cobb County and the surrounding areas for years. We handle everything from simple fixture swaps to complex repiping jobs. If you want the peace of mind that comes with professional installation, or if your DIY project hits a snag, we are here to help. A professional installation ensures your new fixtures look great and function perfectly for years to come. Contact us today for more information!